
The Item is available in stock,we will ship the package box within 48 hours after the buyers pay money via paypal.
Follow along with the assembly and flight review of the FMS Futura V2 80mm EDF jet, factory exclusively in China FMS Model by
Learn how to set up the Spektrum AR637T Smart Receiver and check out the telemetry. Then join Mike McDougall for his first flights of this 80mm EDF jet.
Not long ago FMS released a new Futura V2 80mm EDF Jet. The original Futura Sport Jet was developed in conjunction with a team of Sino-German engineers at Tomahawk-Aviation. Luckily the V2 still retains the original CNC machined trailing-link suspension landing gear, large electronics bay, and stout airframe. However, the V2 has been upgraded to include 13g all-metal gear servos, improved plug-type wing connectors, and a larger, higher kV inrunner brushless motor. The new V2 promises higher performance, improved reliability, and better servo response.
FMS Model Factory sent a Futura V2 to FMS Review Center for Review and included the Spektrum AR637T Smart Technology AS3X receiver. This new Spektrum receiver is compatible with the new Smart Batteries and Smart ESCs as well as having full-range telemetry capability. In addition, the AR637T receiver features programmable AS3X stabilization and SAFE functionality. While I doubt most large-scale EDF pilots would want or need SAFE, it is there should they choose to enable the function.
This melding of improved EDF Jet performance and Spektrum AS3X stabilization should prove to be a powerful combination. Let's open the box and get this baby put together! Since this will be my first 80mm EDF, I'm pretty excited, and slightly apprehensive.
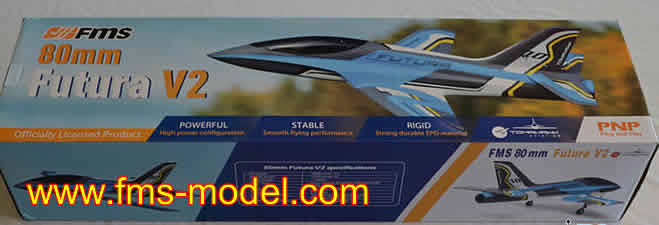
<b>Kit came double boxed with attractive graphics.</b>
Kit came double boxed with attractive graphics.
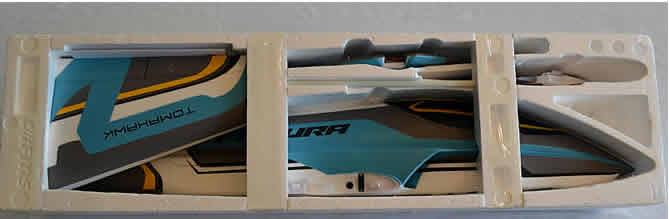
<b>Top layer with all parts safely secured.</b>
Top layer with all parts safely secured.
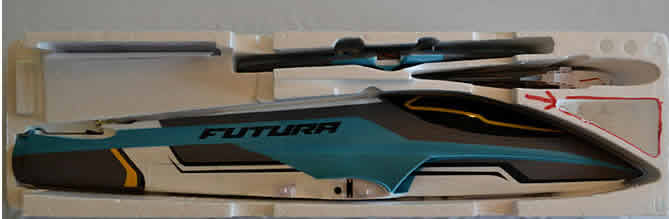
<b>Hardware was hidden under foam sheeting in the triangle-shaped recess.</b>
Hardware was hidden under foam sheeting in the triangle-shaped recess.
First Impressions
My first impression was HMMM, I'm not too sure how that shade of Blue is going to show up on a clear Blue Bird Texas Day. As I unpacked the parts, the next thing I noticed was that the wings looked TINY compared to my usual prop driven planes. They looked more like the size of a stabilizer. The small hardware packet was hidden under some foam sheeting in a triangle-shaped recess of the molded foam shipping container.
Kit Highlights
Retractable landing gear with 10mm CNC machined trailing-link suspension
100 Amp ESC
13 gram all-metal gear servos
Improved wing-mounted servo connectors
Oversized equipment bay for larger batteries
80mm 12 bladed fan with 3280-2100Kv motor
Glue-less assembly, only 10 screws
Kit Contents
Here's a list of the kit parts:
EPO foam construction with plywood and plastic mounting points
Fuselage with motor, ESC, RX and nose wheel retract pre-installed
2-Piece wing with ailerons, flaps, retracts, servos, and gear doors pre-installed
Horizontal stab with elevator pre-hinged and dual servos installed
 Vertical stab with rudder pre-hinged and servo installed
10 assembly screws and a spare
40-Page illustrated Instruction Manual (10-Pages English)
<b>Flight surfaces</b>
Flight surfaces
<b>Control linkages</b>
Control linkages
<b>Slick looking fuselage</b>
Slick looking fuselage
<b>Wing size comparison</b>
 Wing size comparison
Required Parts
Minimum 6-channel transmitter and receiver
4000 mAh to 5000 mAh 22.2v 6S 30C LiPo Battery
2mm hex wrench or driver
Supplied by Horizon for this Review
The FMS Futura V2 comes from FMS Model Factory as a Plug-n-Play airframe. The buyer will have to provide the flight battery and receiver. For this review, FMS Model Factory supplied a 22.2V 5000mAh 6S 30C Smart LiPo Battery and a Spektrum AR637T Receiver.
<b>5000 mAh Smart Battery</b>
5000 mAh Smart Battery
<b>Spektrum AR637T Receiver</b>
Spektrum AR637T Receiver
Assembly
The 10-page Illustrated Instruction Manual detailed the assembly process for the FMS Futura V2.
Like most other FMS manuals, this one was brief and to the point. Why not, it only takes 10 screws to fully assemble the Futura V2. However, there were some finer points of the assembly process that needed to be addressed. This Review will show some of those missing details.
<b>21-Page Instruction Manual</b>
21-Page Instruction Manual
<b>Illustrated assembly steps</b>
Illustrated assembly steps
Wings
The assembly process began with attaching the wings to the fuselage. The wings slid easily onto the fiberglass wing tube and into the fuselage recess. Unfortunately the wing tube recess did not have a detent to prevent over insertion of the tube. To insure equal insertion, the wing tube was marked at 3-3/4" from the ends. Once the first wing half was installed, the tube was adjusted so that the mark was visible before installing the second wing half.
<b>Wing tube marked</b>
Wing tube marked
<b>Tube adjusted to show mark.</b>
Tube adjusted to show mark.
The beefy servo connectors plugged together nicely as the wings slid into place. Each wing half required only two screws to fasten in place. A 2mm hex driver tool made the installation of the four mounting screws so much easier than fumbling with a hex key. There was some difficulty getting the bolt holes to line up with the wing holes. Only tightening the screws enough to get the threads started proved to be a great solution. Once the first bolt was started, the other bolt could be dropped into place and easily started. Tightening the screws evenly was then possible.
<b>Fuselage connector block</b>
Fuselage connector block
<b>Wing connector block</b>
Wing connector block
<b>Everything all lined up</b>
Everything all lined up
<b>2mm hex driver starts 1st screw</b>
2mm hex driver starts 1st screw
Horizontal Stab
The next step was to mount the horizontal stab to the rear of the fuselage. Unfortunately the wire recess molded into the fuselage was not large enough to accommodate the two elevator servo connectors and the excess servo wire leads. Using a long pair of forceps, the servo extensions could be pulled forward into the equipment bay area while carefully guiding the connectors into the tail recess. Once the servo connectors were moved forward into the fuselage recess, the horizontal stab then slid easily into place and was attached with 3 screws. The front screws could be firmly tightened till the molded plastic studs bottomed out, but the rear screw only needed to be tightened till the molded plastic insert began to pull down into the foam of the stabilizer.
<b>Both elevator servo leads and connectors must fit into that tiny recess.</b>
Both elevator servo leads and connectors must fit into that tiny recess.
<b>Carefully pull the servo extensions forward.</b>
Carefully pull the servo extensions forward.
<b>Connectors and excess leads out of the way</b>
Connectors and excess leads out of the way
Vertical Stab
Likewise the vertical stab servo connector and servo extension lead needed to be pulled forward so that they did not interfere with the vertical stab installation. Taping the servo lead to the servo extension secured the electrical connection and allowed the assembly to be guided into the fuselage recess. The vertical stab then easily slid into the fuselage and only needed three screws to hold it in place.
<b>Too much wire, too little space.</b>
Too much wire, too little space.
<b>Rudder servo extension pulled forward.</b>
Rudder servo extension pulled forward.
<b>Excess connector and lead out of the way</b>
Excess connector and lead out of the way
All it took were 10 screws and the assembly was done! It took much longer to describe the process than it would ever take to fully assemble the Futura V2.
Once the assembly was completed, it was time to install the Receiver and get this baby ready to fly.
AR637T Receiver Installation
The Futura V2 featured an open equipment bay area, but there was not a dedicated location for the receiver. Since the raised area to the front of the fuselage might be needed for lighter battery packs, only the sides or top of the fuselage behind the battery area looked feasible. The right side of the fuselage was selected as it was close to the centerline of the airframe and the servo wires easily reached the receiver servo slots.
Plastic coffee stir sticks were glued to the inside of the fuselage to help route the receiver antennas and keep the end sections perfectly straight and properly oriented. One remote antenna was routed straight back under the top of the fuselage, and the other antenna was mounted vertically on the left side of the fuselage.
<b>Coffee stir stick glued in place then trimmed.</b>
Coffee stir stick glued in place then trimmed.
Second stir stick in place.
Second stir stick in place.
Once the servo leads were plugged into their proper receiver slots and the antenna leads were routed into their stir sticks, the receiver was safely secured to the fuselage side using double-sided servo mounting tape.
<b>Receiver secured in place.</b>
Receiver secured in place.
AS3X Programming
I have to admit that I've really enjoyed flying with AS3X stabilization on many of my planes. I've used Spektrum AS3X receivers in 40cc gassers, 20cc gas and electric scale models, and lots of foamy sport planes. I don't always fly in AS3X Mode, but it is sure nice to have it available for those extra gusty days or difficult landing situations. Since AS3X worked so well in my Warbirds, it was only natural to use the Spektrum AR637T receiver for my first 80mm EDF jet.
Once the AR637T receiver was bound to the iX12 transmitter, the flight surfaces were checked for travel, movement direction, and centering. It was then time to pull up this excellent set of videos produced by FMS Model Factory and Spektrum RC detailing the step-by-step process for fully programming the AR637T receiver.
AR637T AS3X Setup Series #1 - Introduction (4 min 3 sec)
For the initial Gain programming, the left slider on the iX12 transmitter was used to adjust the value of the Gain. The slider was selected because the right stick could be used to maintain primary flight control of the aircraft while the gain value was varied with the slider. The slider was initially set for -100 (No AS3X Gain) all the way to the left, 0 (Mid AS3X Gain) in the center, and +100 (Max AS3X Gain) all the way to the right.
As stated in the videos, individual model differences and pilot preferences will all come into play as the Gain values are adjusted. I was a bit concerned that a fast jet like the Futura 80mm EDF could overload the AS3X and cause oscillation issues. Luckily, Spektrum had done a great job in the basic design of the AR637T - surface oscillation was not an issue on the Futura V2. The final gain values for the Review Futura V2 were as follows:
-100 for AS3X OFF
0 for High Speed Stabilization
+80 for Low Speed/Landing Stabilization
NOTICE!!!
While these values worked for the Review model, please follow the steps in the video to set up your individual Futura V2.
The combination of the AR637T receiver and a Telemetry ready Spektrum transmitter also allowed for real time data telemetry from the Futura V2. Various data values were available including altitude and g-loads on the airframe as well and Min/Max data values.
Completion
The completed FMS Futura V2 weighed 5 lbs 12 ounces with the 5000 mAh Smart Battery on board. The plane balanced perfectly at 4-1/8" back from the leading edge of the wing with the battery to the front of the battery tray.
<b>5000 mAh Smart Battery forward on the battery tray.</b>
5000 mAh Smart Battery forward on the battery tray.
I set my Dual Rates for each flight surface on 3-position switches and set them at 100%, 85%, and 70%. Since I like a little exponential, I set 20%, 15%, and 10% Exponential respectively. The transmitter countdown timer was set for 4 minutes and set to start and run at any throttle setting above 25%.
Flying
The FMS Futura 80mm EDF looked like it was going 200 MPH just sitting on the tarmac. Like I mentioned earlier, this was my first 80mm EDF jet, so I kept reviewing EDF flight recommendations in my mind like there's no prop blast over the flight surfaces so keep the speed up. The wings are tiny, so keep the speed up. The wing loading is higher than a Warbird, so keep the speed up.
Luckily the Futura V2 was surprisingly mild mannered and it flew pretty much like a fast sport model.
Taking Off and Landing
Our club field has a GeoTex runway surface that is 450' x 45'. Unfortunately it slopes downhill to the South, so a fast model landing that direction can sometimes run out of runway. Luckily the wind was out of the North for the first flights of the Futura V2 and landing UP hill would help it slow down. All takeoffs were made without any flaps and with full AS3X. All landings were made with full flaps and full AS3X.
Maybe it was the Tri-cycle landing gear, or maybe it was the lack of a big old prop up front, but the Futura V2 tracked straight as an arrow on every takeoff. Throttle was evenly applied all the way to full throttle, a bit of elevator was added, and the Futura V2 was airborne in less than half the runway. The rate of acceleration from standstill to flight speed was much faster than anticipated. The Futura V2 almost leapt off the runway. Gear up, throttle back a bit, AS3x to mid rate, and we were flying! Nothing to it!
Landings however took a bit more work than takeoffs. With the gear down and the flaps at full, the Futura V2 slowed down nicely, but it was still moving fast like a Warbird. Best landings were made with the nose slightly high and flying the plane down to the runway. The trailing-link suspension gear and the sprung trunnions helped smooth out the less-than-gentle landings experienced during the EDF learning process. They also came in handy when running off the runway surface because the approach was too high and too steep and too fast. A bit of practice was all that was needed to get the proper technique down.
High Speed/Full Power Flight
In a word - Amazing! High speed flight is one of the best parts of flying EDF jets. Well, speed and that wonderful Whoosh sound as the Futura V2 streaks on past. Estimated speed was around 100 MPH flat out. At that speed, the Futura V2 covers a lot of ground in a hurry. Flying at full speed requires a bit of planning to get the Futura V2 turned around before it gets into the next county. Immelmann turns seemed to work best to get the plane headed back in the right direction. Huge loops were easy with plenty of power on tap. Slow rolls and point rolls looked great. Knife edge passes only needed partial rudder for straight flight. Aileron rolls were fast and crisp. Vertical flight was almost unlimited.
Cruising Speed
Most aerobatics didn't need full throttle. In fact, partial throttle was a comfortable place to fly because it conserved battery and extended the flight times. In addition, the Futura V2 made this wonderful whistling sound as it coasted on by and then climbing out with full throttle sounded just like a real jet hitting the afterburner. Stall turns were possible if the rudder was applied long before the plane stalled. Outside snaps were impressive.
Gear Down, Full Flaps
This Futura V2 slowed down nicely with everything hanging out in the breeze. It was very controllable and didn't exhibit any bad habits. Figure 8 circuits of the field were very nice and lining up for landings was very easy.
Is This For a Beginner?
The Futura V2 would not be my first choice as a trainer for an absolute beginner. Even though the optional-use SAFE technology available in the AR637T receiver might make that an option, I would still not recommend this plane for a first-time beginner pilot.
That being said, the Futura V2 would be the perfect first EDF for any intermediate or expert pilot.
Flight Video
My buddy Jesse Webb was ready with the Camcorder and the Futura V2 was charged and ready for its video. This was only the second and third flight on the Futura V2, but I was sure that Spektrum AS3X would keep things on track. Huge Props to Jesse for keeping up with this plane and working around that large mass that got in the way of the video.
FMS Futura V2 80mm EDF available from FMS Model Factory - FMS Review Center Review (6 min 26 sec)
Flight Photo Gallery
The Texas weather finely cleared up and Jesse Webb had the Nikon at the ready. It was time for some beauty shots. I hope you enjoy the pictures!
Takeoff!
Gear Going UP
Heading for Home!
Gear Down, Flaps Down
Touch Down!
Touch Down!
Final Thoughts
This 80mm EDF jet was a very pleasant surprise. The Futura V2 blue coloration showed up well in clear Texas skies and the Futura V2 was much easier to fly than anticipated. Yes, you still had to remember that it was forward velocity and airflow over the control surfaces that allowed flight control and not "prop blast." Luckily the improved power system in this version made accelerating to flight speed from any attitude happen much faster. Landings will still take a bit of practice and concentration, but the big payoff will come when you grease one in. I promise you that your fellow pilots will surely notice.
Once the Spektrum AS3X stabilization was properly tuned, it gave just the right amount of help when needed and stayed out of way when not needed. In addition, the Spektrum Smart Telemetry gave some useful data to allow the modeler to check the performance of several flight components.
Overall I like the Futura V2. It will be getting a lot of air time this flying season.
Pluses
Spectacular EDF Speed and Performance
Trailing-Link Retract Suspension
Effective Flaps
Powerful EDF Motor
Bright Blue Color Scheme
AS3X Stabilization (Spektrum AR637T RX)
Spektrum Smart Telemetry (AR637T RX)
Minuses
Wing Tube Could Be Inserted Unevenly In the Wing Halves
Cramped Wiring Recesses for the Elevator and Rudder Servo Wiring
The Item is available in stock,we will ship the package box within 48 hours after the buyers pay money via paypal.
The Item is available in stock,

